Submitted by AliaK on Sat, 02/11/2013 - 12:34
Textiles 1 — A Creative Approach — Assignment 1
student name: Kathleen (Kath) O'Donnell
student number: 511607
Assignment 1 — Reflective Commentary
(based on assessment criteria points)
also available as a downloadable PDF file — 77Kb, 2 pages
Demonstration of Technical and Visual Skills materials, techniques, observational skills, visual awareness, design and compositional skills
Whilst working on the class exercises, I learnt many new techniques, including mark-making with various materials, hand embroidery stitches and how to do machine embroidery. I began to see patterns and marks whilst I walked around the city, and began to see shapes that could look interesting when stitched. Once I learnt a few embroidery stitches, I began to see them everywhere in the streets, in my hotel rooms and in in ordinary, pataphysical objects. I'm still working on my sketching, as I still don't feel as confident doing this, but I enjoy taking photographs of different patterns instead. The class exercises did help in "freeing up" my drawing skills and ways of thinking.
Submitted by AliaK on Fri, 01/11/2013 - 12:32
A Creative Approach — Project 2 Developing your marks — Stage 6 — Using thread and yarns to create textures
In this exercise we had to use different threads and yarns to create textures.
front side:
rear side:
I tried another - with different layers of fabric, different stitches and different/multiple threads of varying weights.
close ups:
rear side:
I had made some small sketches (finding I like the A5 size, small but handy to carry around), so the stitching above is based on some of the shapes in these sketches.
Reflection:
• Can you begin to see the relationship between stitching and drawing?
yes, definitely. I can see it more and more since working on these exercises. I think I have even started to draw/sketch with stitching in mind.
• Were you able to choose stitches which expressed the marks and lines of your drawings?
yes, I learnt a few stitches including running stitch, back stitch, blanket stitch, stem stitch, chain stitch, cretan stitch, satin stitch and was able to adapt some of these to match the marks in some of my sketches.
Submitted by AliaK on Wed, 02/10/2013 - 12:30
well, I was trying a knit-a-year project but since I don't have much yarn here (on overseas trips) and have been more interested in stitching and embroidery lately, I've decided to shift to a stitch-a-day project instead. I might use my other blog for another project so will relocate the articles here (or add to the previous post).
my first attempt - I've been totally inspired by the work of Junko Oki and since attempting to stitch circles in a modified blanket stitch, I can see more clearly just how fine and free her beautiful stitching is. mine feels large and clumsy in comparison, so I will need to practice more to create smaller stitches. also, I need to bring more fabric to use as a background as on this trip I only have some calico, and a couple of coloured threads.
there's lots of circles & other textures in the hotel room. the carpet has concentric circles - a bit like the Maori koru shape. I like the red crushed velvet lounge chair in the room too - it has some nice lines and shapes in the shadows
06/10 update:
I stitched some more circles and other shapes this weekend
Submitted by AliaK on Sun, 29/09/2013 - 12:29
tonight I've been taking a look at embroidery by Junko Oki - she has some beautiful pieces. I love her use of circles and lines.
I emailed her to order a copy of her new book, "Culte a la Carte" (I think her first book has sold out), and mentioned I was doing a textiles course and had been enjoying embroidery. I asked if hers was all stitched by hand or mixed with machine embroidery too. she responded,
"I'm glad to you interested in my work.
My work is stitched by hand all.
I do not have that you have to study about embroidery .
I have the feeling produced in like writing a picture."
the circles are intricate rows of fine blanket stitch, with lines in running stitch and some feather stitch. lots of "sun" themes. I'm really loving it. the imperfections and textures created by the stitching mixed with the choice of textures and colours of the fabrics as the backgrounds. I'm looking forward to the book arriving so I can see more of her work.
I love some of the backside stitches, ie via February 2012:
from Dee's Hall from October 2012 - a lovely portrait of a woman's profile.
Submitted by AliaK on Tue, 17/09/2013 - 12:27
I've been away from my class materials since working on this new work project. which means I haven't had as much fabric, paints, threads, the sewing machine etc to work with. I found an app called art set on the itunes app store and tried it out on the flight home last week. it's pretty good. it has a large range of colours, and background "paper" with different textures and colours and weights - actually more than I have at home. plus multiple pens, pencils, felt pens, paints, crayons, sponges, erasers, water for smudging edges, and the app is really easy to use. it's not the same as using the materials by hand of course, but I think it does replicate the styles / effects the materials have quite well. and it was only 99cents. wish I'd known about this prior to spending a couple of hundred dollars on a much smaller range of pens and paints! I tried a few simple mark making exercises, then I took a photo from the front airplane camera (was my first time on an A380 & it has camera views on the tv/entertainment system - a view from the front of the plane, below near the wings, and looking towards the tail of the plane) and made a drawing of the view.
Submitted by AliaK on Tue, 10/09/2013 - 12:26
I'm going to try the knit a year project after hearing about it from Michelle from Reef Knot (& recently 107 projects). the aim is to knit a minimum of 2 rows each day, using a different colour to reflect my mood for the day & leaving a thread at the edge of the piece to show the start of each day
http://knitayear.ning.com
knitrageous has written a great post about the project - she travels also so has similar issues to me, ie not having your yarn stash with you all the time.
I think it'll be an exploration in colour and texture - perhaps I'll add some embroidery over the yarn, or try some weaving also.
as I'm traveling at the moment, I don't have my yarn stash available so I brought some multi-coloured sock yarn with me and will use different colours from this whilst away. it means cutting up the yarn and thereby ruining the skein but this should be OK - I can always join threads if needs be.
I cast on 23 stitches, which is different to the instructions, but 23 has a bit of maybe logic flavour to it. I think I'll leave tails on both sides too
traveling yarn stash
Submitted by AliaK on Tue, 10/09/2013 - 12:02
I've been staying in the same hotel for the past few weeks in Auckland, in different rooms each trip. I have been noticing the different patterns in the furnishings and textiles in the room. the room I'm in now has a mixture of lines and circles - none of them perfectly shaped. they have a nice feel about them, and match the nearby building's outer surfaces too. the carpet lines in the corridors flow through to match the blanket on the bed which has similar curves stitched onto the ends of the blanket.
Submitted by AliaK on Sun, 08/09/2013 - 12:00
I put the sewing machine in for a service at Chatswood Sewing Centre prior to my work trip & collected it on saturday. it's working much better! the dropped stitches problem from my previous attempts has been fixed - apparently this is caused by the timing being out, so the position of the bobbin & needle are mismatched which cause it to drop stitches intermittently.
I tried some machine embroidery and had much better results too! I haven't worked out the full control of the machine in freehand mode but I made some marks with it, and some circles. I also did another test swatch with straight stitches (in normal sewing mode) and the decorative stitches, and they're all looking much better.
the fabric is bunching a bit with the stitches. I just grabbed the first scrap of fabric from one of my bags, so I'll have to try some plain cotton too to see if that helps. also I think I need to guide the fabric more carefully and perhaps hold it taut more whilst moving it around, so it doesn't bunch up more.
zoomed in: (I need to rescan this - the scan came out blurry in parts)
Submitted by AliaK on Thu, 29/08/2013 - 11:59
this week I'm away from home, and have been sick. it's thursday and the first day my head's felt clear in ages. after a week of early night's sleep with nighttime cold'n'flu tablets I'm finally catching up on some class work.
tonight I came across these projects:
Submitted by AliaK on Sun, 25/08/2013 - 13:42
Submitted by AliaK on Sat, 24/08/2013 - 11:58
prep for assignment 2 / part 2: building a visual vocabulary
these notes are mostly to list which materials & techniques will be used in the exercises, so I know what to prepare for
project 3: colour
materials
Submitted by AliaK on Wed, 21/08/2013 - 11:56
A Creative Approach — Project 2 Developing your marks — Stage 5 — Stitches which create texture
In this exercise I had to work stitches in different directions, initially using the same type of thread, and then introducing other weight threads. I used a single colour thread (or as close as possible) for each sample. Some threads are shiny and thin whilst others are thicker, multi-threaded and matte. when you mix them together you can see the difference in texture each creates, as well as different textures caused by the different amount of light the threads reflect.
I began with satin stitch in red shades, using different stitch lengths and shiny and matte thread. The rows of satin stitch sit nicely next to each other. Some of the threads look softer and others look rougher.
My favourite sample is the thin white triangle peaks. The stitches are fairly close together, thinner at the bottom of the upside down V and there's a thicker gap at the top. I stitched different number of rows along the rows. I think this makes a nice pattern and it's something I could use in a project. I'd tried he triangle peaks in thicker orange yarn too but I don't think it's as effective — it seems to soften the edges, whereas the thinner white thread is more precise so the lines are more defined and crisper to my eyes.
Submitted by AliaK on Mon, 19/08/2013 - 11:54
A Creative Approach — Project 2 Developing your marks — Stage 4 — Preparing to create textures
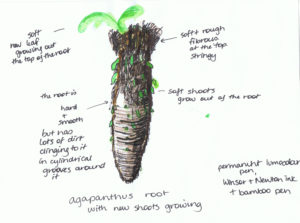
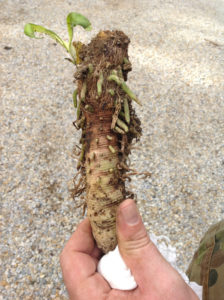
In this exercise I had to look through some of my previous work and think about them in terms of textiles and creating textures. I looked at some of my sketches, but one stood out the most is the Agapanthus root from stage 3, exercise 2 — it's the ugliest topic and drawing but I think it does show a lot of texture. It's both rough and shiny, lumpy and distorted, it has hard and soft parts, and chaotic stringy parts.
Here's the drawing and original photo:
Submitted by AliaK on Sat, 17/08/2013 - 11:52
I've been looking through the craftivist collective website and some of their projects. they do many fibre / textiles / craft based activism (craftivism) projects to raise issues to people in the community. they also write about slow activism and the importance of personal reflection when making - I love this idea and it's something people can do from home without having to be too vocal (verbally) with their ideas - work on projects to highlight issues they think are important. so I purchased one of their mini protest banner kits and it arrived from the UK yesterday. tonight I embroidered a message and sewed the aida onto the fabric. it was the first time I've embroidered letters so the first couple of lines are a bit wonky (especially the "D"), and I found it easier to write in all caps so I'm probably shouting the message, but I was getting the hang of it towards the end (though I ran out of space on the last line - need to plan it out next time)
Submitted by AliaK on Mon, 12/08/2013 - 20:55
I’ve been looking through the craftivist collective website and some of their projects. they do many fibre / textiles / craft based activism (craftivism) projects to raise issues to people in the community. they also write about slow activism and the importance of personal reflection when making – I love this idea and it’s something people can do from home without having to be too vocal (verbally) with their ideas – work on projects to highlight issues they think are important. so I purchased one of their mini protest banner kits and it arrived from the UK yesterday. tonight I embroidered a message and sewed the aida onto the fabric. it was the first time I’ve embroidered letters so the first couple of lines are a bit wonky (especially the “D”), and I found it easier to write in all caps so I’m probably shouting the message, but I was getting the hang of it towards the end (though I ran out of space on the last line – need to plan it out next time)
Pages


